


On my recent trip to San Francisco I knew exactly the jacket/coat I needed, both there in the misty mornings and at home in the windy and wet days here in Halifax.
Unfortunately I didn’t have exactly that coat with me on my trip. However the first thing I did when I got home was start sewing one.

Jalie’s Stretch City Coat pattern has been around for a while. Many folks have made it, and many of them have made it in a woven, just using a larger sized pattern. I really wanted to stick to the original intent and so having been keeping my eyes open the right stretch fabric for a couple of years now.
I finally found it along the back wall of my local Fabricville.
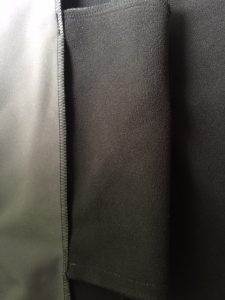
I decided to use a grey outerwear fabric with a micro fleece bonded to the inside. It is a pretty interesting fabric. The outer side is a tightly woven poplin, much like commander if you have sewn that, and the inside has a very fine micro finer fleece bonded to it. Perfect if you want weather resistant with a little warmth but without the hassle of putting in a lining.
I found this fabric very easy to sew. I used a standard sharp needle and polyester thread but I did lengthen my stitch length to 3.0 for construction and 4.0 for top stitching. There is a fair amount of volume to this fabric, sort of bouncy like Ponte and I felt that the longer stitch length was just more compatible with it.
I made a few changes to the pattern.
First I couldn’t decide on whether or not to do the collar or hood view – one is dressier one more useful – so in the end I made the collar view but sewed the hood up as a separate unit and added three snaps to the back of the collar stand so I could snap on the hood as needed. I placed one snap just a half an inch or so from the end of the collar stand on each side and one at centre back on the back of the stand on the jacket. I then just sewed three snaps on the inside of the hood to match.
This is a bit of a pattern hack and I do realize that one result of that is that the collar has to stand up when the hood is attached. You might think this looks weird but living in Nova Scotia I have no problem with as many rain barriers as I can get. I have also convinced myself that this detail looks edgy and works with the techno nature of the fabric. If you disagree, don’t tell me.
The other variation I made was to change up the suggested buttons and buttonholes for big sew-on snaps. I test sewed a few buttonholes and they just looked small and wimpy to me in this fabric so I went back down to Fabricville and got these wonderful snaps – large ones for the coat and smaller ones for the hood/collar attachment.
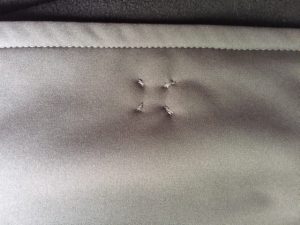

A word on the snaps. I have observed in RTW that the stitches for big fashion snaps like these go right through to the right side of the fabric. Once you get your head around this, and the fact that your hand stitches might not be 100% perfect and that is OK, this are easy to stitch on. Each snap has two holes at each corner which I used in the coat but for the smaller collar snaps just sewed them on through one hole as we are used to doing with snaps.
Use a biggish needle and I really recommend a buttonhole twist or heavier thread for the snap sewing on. The metal of the snaps tends to break an ordinary construction weight thread. I should note though that sewing on all these snaps carefully took a bit of time. I probably spent two sewing days to make the coat and about three sewing nights to do the snaps.
Finally pockets in this coat are interesting – sort of free floating square bags that the pattern instructions tell you to tack to the facings, giving you a reference to an illustration that seems to be on longer available on Jalie’s site.
As a result I sort of improvised here and folded the pocket bags slightly vertically and did a short row of machine stitches to secure the pocket top and bottoms to the facings. This actually seems to work quite well, holding the pockets in place so they don’t flop around but not pulling on the facing.
I really am very pleased with this coat – it has a combination of style and function that really appeals to me. I know I am going to wear it a lot – both at home and when I am on tour visiting.


12 comments:
That really looks like a useful coat. Thanks for the detail on making the detachable hood and the snaps.
Great coat! I have got a lot of wear from mine too. I made it from a power stretch fabric from Peak Fabrics online store in Calgary and put domed snaps.
I LOVE THIS PATTERN! And I am so glad to see it made up. I have a great stretch woven purchased a year or so ago that I've been saving for this project. I am still on the fence re: hood or collar but will figure it out and move forward. Thank you for this review -- your coat looks great and is inspirational!
What a lovely coat. You're right about the edgy detail, I really like the collar standing up!
That is a terrifically smart looking coat on you. I like the collar standing up under the hood - chic!
I just love this stylish yet practical coat but I do have a hard time embracing the technique of sewing snaps on showing stitches through to the right side. I guess I need to look closer at RTW for this. Thanks for sharing. Karen
This reminds me of a Talbot coat I bought twenty years ago, similar design lines. Still wear it. Great coat!
Practical and stylish, the perfect combination. I like the hood idea since I sometimes need a little wind or rain break.
Your hood construction is exactly the same as my beloved L.L. Bean 3-in-1 jacket, so no weirdness there. That rain jacket also has a zip-in fiber-filled jacket for cooler temps. Love it, will miss it when it finally dies.
What great fabric you found! I love the hood idea and will try to remember it when it is jacket making time for me. AND it looks like you are growing your hair out a bit? Happy June,'
ceci
That is a great looking coat!
I have had a few RTW coats with a removable hood that fastens under the hood, as you did yours. It must be more commonly done than you think.. it looks great on you, BTW.
Post a Comment