Search

Sewing with less stress Front

Sewing with less stress Front
My newest sewing book

Sewing with less stress back cover

Sewing with less stress back cover
What my new book is about

Clothesmaking mavens

Clothesmaking mavens
Listen to me on the clothes making mavens podcasts

About me

My photo
I am a mother, a grandmother, and a teacher. But whatever happens in my life, I keep sewing. I have worked as a political communicator and now as a teacher in my formal life. I have also written extensively on sewing. I have been a frequent contributor and contributing editor of Threads magazine and the Australian magazine Dressmaking with Stitches. My book Sew.. the garment-making book of knowledge was published in May 2018 and is available for pre-order from Amazon
SIGN UP BELOW FOR BARBARA EMODI'S MONTHLY NEWSLETTER

FOLLOW

SIGN UP TO FOLLOW BARBARA EMODI'S BLOG "SEWING ON TH EDGE"

Follow me on Instagram

Instagram
Follow on Bloglovin
Showing posts with label Chanel jacket. Show all posts

Friday, May 4, 2012

Claire Shaeffer's Chanel Jacket pattern preview


Remember this pattern? Remember me nearly losing my mind over my Chanel jacket experiment fiasco last month?


Well thanks to the miracle that is US mail my BMV order arrived today in my mailbox. You have to know it often takes 5-6 weeks for patterns to arrive at home in Nova Scotia. 


Listen if Homeland Security ever wants to really tighten things up they should contact Canada Post/Border control. Those guys really know how to scrutinize. Last Style Arc order I got at home came with a letter to say they had to open my package and check all my patterns just to make sure that's what they were, and that I should inform the shipper to mark sewing patterns on the package, not just paper products or whatever. They held up my patterns for 2 months. That made me feel the world was a safer place.


Back to Chanel.


Claire Shaeffer has a reputation for knowing her way around couture-wise so I was interested/surprised to see some changes to her method vis a vis the original Chanel techniques that were so trying on my sanity.


Here they are:


  • Interfacing, on neckline and sleeve and bottom hems.
  • The units get pretty much done and completed (front, back sleeves) before they are attached.
  • This is the important part - she has you sew up the unit body, say the back and the lining back with all the princess seams and all that stuff and then you do the quilting of that part. This eliminates all those overlapped and hand sewn seam allowances (there are about 400 of them on the average jacket) you have to deal with in the old technique. THIS IS HUGE.
  • The side panels are not quilted at all.
  • She also advises little custom darts to be sewn in the lining only to pull it in here and there at the waist, wherever you think you need them as sort of an after market feature.
This will make the jacket far more manageable and when I am back at the homestead I am going to give this a whirl.

That's all the good stuff. I should warn you that the instructions for making the hand bound buttonholes take about half the written text and made me feel like I was reading the how-to's for a DIY Faberge egg. Not something you would whip off during the commercials.

Definitely going to be doing some trail runs on those and not letting myself get my hopes up.

But buttonholes aside mark me down as cautiously optimistic as we used to say in political spin.


Wednesday, April 11, 2012

Chanel jacket deconstructed

A lot to say about this project. Here is the summary:


  • Yes, the finished project is as comfortable as promised. This is a serious consideration when thinking about doing one of these jackets. I have long thought that so much sewn into women's jackets - all the interfacing, lapels, taping and shoulder pads, sleeve heads and shoulder stays really are all constructs of male tailoring. I do not need to look like a male banker and I don't want to feel like one. You have to be comfortable to get through a girl's day.
  • However you really need to love your pattern. Note to self. Any pattern that took this much time to fit, in the muslin and in process, was a bad pattern for me. A good pattern for you requires only a few tweeks - I have decided once you start to do more you and the pattern are at cross purposes and always will be.
  • You really, really need to love your fabric. I loved my lining and would have thrown the whole thing in the garbage at the first midnight otherwise. It would have been good to have felt the same way about my outer fabric, which I am convinced spent the whole time wishing it was something else, like say an A line skirt. Don't try to convert your fabric. Also you are going to spend so much time with this you have to like it to get past the worst part of for better or for worst.
  • All the hand stitching was wasted in the sleeves. Because I did a 3 piece sleeve (waste of time for a vent but worked for my rescue treatment) I ended up with 12 little flags of silk to hand stitch down before I could sew it in around the armhole. I found these little units most annoying. Next time I unit quilt the sleeves and hong kong the seam allowances on them. Done and just fine. I may still do the body traditionally as it does make a nice little inside next to your body. You never know when you will wear this with a bathing suit.
  • The chain is a good idea - might sew light chains to the hems of some knit jackets or cardigans as an experiment.
  • Forget tiny pockets unless you are a tiny person who carries tiny things. No dog leashes, no snacks.
  • On the subject of scale my expensive bought trim looked wimpy. I figure to scale it up to me I need a trim that is about 1.5-2 inches wide. This would require layering a couple and that would have required driving back to Nova Scotia to get it. I doubt there would have been much buy in for that.
Will I do it again?

Yes, but only because it is comfortable, but with a new pattern (I really enjoyed stuffing the old one in the kitchen garbage can) and something simpler. May even do this New Look pattern

After all if all I want is a sweater disguised as a jacket why complicate things?

BTW Janine's suggestion to add a button to the top of the vent is a great one, I even dug out a scrap from the garbage in case I can locate a button form somewhere.

Next I am putting my feet up and sewing Stylearc's Jane blouse.


Tuesday, April 10, 2012

Final shots, that damned Chanel jacket finally

Well here we are. Nicely accessorized with beach bum hair, Peta pants-into-shorts, and tank top. 


See you can wear Chanel with anything.


Tomorrow, when I have recovered from sewing that hem chain in till late at night, I will post some profound thoughts on this experience.


In the meantime here are some pics taken by a photographer who made me laugh because he has been listening to this all week and is just as glad as I am this particular project is in the out basket.


Note my original open slit sleeves. You can do this yourself if you put your vents in backwards and cut them off in a rage at 11:00 p.m..


It's actually pretty easy.


Please tell me if these sleeves look like what they are which is a huge mistake and a tired attempt at a save.


More tomorrow in the words department.


Let me outta here. Got to do a cotton blouse next.

Saturday, March 24, 2012

Conceptualizing the Chanel jacket

Half way through now I think I am feeling this jacket.


I like the silk charmeuse lining on my skin - I also realize that some leftover Adele top rayon knit would make a comfortable shell to wear with it - Zebra to zebra.


I like the lack of interfacing and serious stuff - let's face it a little hand sewing is easier on the brain than tailoring.


However I am thinking about why I am doing what I am doing.


The whole principle is to laminate the lining to the outer fabric and just turn in the garment edges and cover them with trim. That's really all this project is about - what you aren't doing as much as what you are doing.


It's sort of minimalist sewing if you squint at it.


The fussy part is the leaving enough unlaminated around the seamlines so you can actually sew the thing together and then of course cover this up with lining. Negotiating that requires stopping your quilting lines short, tying off the threads and then handsewing the free lining edges down at the seams.


I wonder if it wouldn't be easier to just quilt the yardage, which would be the easiest way to get all the quilting lines on grain, cut out the units from the then "double sided" fabric.


Stitch her up and then just hand sew cover the seams with bias lining strips, which you could run through the bias tape maker as a time saver.


Of course you would have to do something with the hems and edges, I will ponder this while I walk the dog.


What do you think?


Would this be more efficient? Take more time?


Or not?

Lamination complete

I have added this photo to horrify you and to reassure you that I am doing this project in a casual sort of way.

The Chanel/project/muslin/jacket/ better-be-as-comfortable-as-a-sweater is now onto step three.


I basted all the lining pieces to the body pieces and yesterday I quilted them all up. As you can see from the above I didn't do a sterling job but it was a job. My traveling machine with the broken take-up lever came back still broken from the shop, they don't make that part anymore, although my husband had a happy time with the Epoxy last night.


So I did my quilting with my small Janome I keep with me for doing buttonholes with my vintage buttonhole attachment:


It does a wonderful job with the buttonholer, but is a bit small for quilting and I don't have a walking foot with it.


The quilting is done from the right side and since my fabric is black it was hard to see how well I was spacing my quilting lines, although I did get them on grain, which was my priority. So the quilting job looks more like art work than quilting work if you get my drift.


I really could have used a quilting bar, but since I allocated only one afternoon of my life for this job off I went. Remind me not to wear it to the Sewing Guild where they are for sure going to open me up the minute they see my jacket and then go all silent while they inspect my stitches.


I was pretty skeptical of whole process but when I got up this morning and pressed all pieces I was totally amazed to see how well the stitches embedded - you can't really tell at all from the right side that there is stitching. 


What do you know.


Here is what I learned:


1. With all difference to Claire Shaeffer I am not going to bother with the basting next time. I basted all Thursday and took out the basting all Friday. This is not A Good Use of my Time. I will just use a million pins next time and take them out as I go.


2. Trying to find the grainline (all the quilting lines need to be on grain) in black fabric is the pits. If I do this again I am definitely going to use a fabric with a real dominant thread I can follow. This is sort of a herringbone semi-boucle and not ideal.


3. In my online class the stitching was done on the right side of the fabric, which makes sense because the garment pieces are cut to size and the lining is cut bigger, and of course you have to stop the stitching about 2" from the edges so you can get in there and sew the seams. Next time I will do the first row from the right side following the grain and then flip it over and use this one line of stitching as a guide, use a quilting bar, and work from the lining side so I can see what I am doing.


4. I was nervous about doing all this quilting on fabric of dubious loft so I did my quilting 2" apart, next time I would be braver and do them 1" apart for more secure lamination although this will be fine once the seams and everything are sewn in.


5. I didn't have a walking foot and I know just enough about quilting to know that if you stitch all the lines in one direction you will get warp so I stitched up one line and down the other, I stitched across the bottom from one row to the other, turning it, ( see lovely illustration of inaccurate sewing above) which also reduced the number of threads I had to tie off. (Apparently you never back stitch in couture, makes sense when your stitches are going to show on the right side).


6. The deal when all this is done is that you take any thread ends and pull them through between the layers and tie off. To save my mind I pulled on one thread from the right side until the bobbin loop showed, grabbed this (both threads were now on the right side) threaded them both through a needle and the pulled and knotted them between layers.


Next of course I will stitch up some structural seams and see how this looks.


Seems awfully light to me so far for a jacket, and I remain skeptical. I am not sure if I am culturally (as a random person) all that suited to this kind of sewing (the precise kind) but we will see.

Wednesday, March 21, 2012

Chanel sort of

I can't thank you all enough for the comments to my last post. 


This has helped me decide what to do next.


Since my main travel machine is now in the shop (freak accident, my shirt caught and broke the take-up lever) a little hand-sewing is in the cards.


I am definitely going to order that Stylearc Coco jacket when I have a fixed address. In the meantime decided to jump in with my current version of a pattern (a Simplicity jacket that was so big that I took days taking it in and adjusting it and I do not recommend it) and my new approach to classic Chanel technique:


Do it in sort of a relaxed Babs way, and if it works out it works out and if it doesn't it doesn't.


Since this is my general life philosophy I am comfortable with this approach to this project.


Sometimes when I take a sewing class with other sewers I am amazed at how precise they are, how exact they measure, how careful . Now I am not totally reckless but I think I have more a feel for sewing than a precision in what I do.


There are a couple of things about the Chanel project that appeal to me:


1. No interfacing and heavy construction like sleeve heads. I like light clothes that don't get in my way.
2. Simple design lines. Princess seams and only patch pockets. No tricky lapels or welts that require Thought.
3. No separate and then attached lining. Sometimes this is a pain, I feel like I am making two garments.


What I don't think I will like:


1. All that slow hand sewing.


My intention is therefore to try to breeze through it. Pre-apologies to wonderful, brilliant sewists like Bunny who are so excellent in their hand stitching, and to anyone else who knows how to make one of these jackets properly.


OK. Here we go:


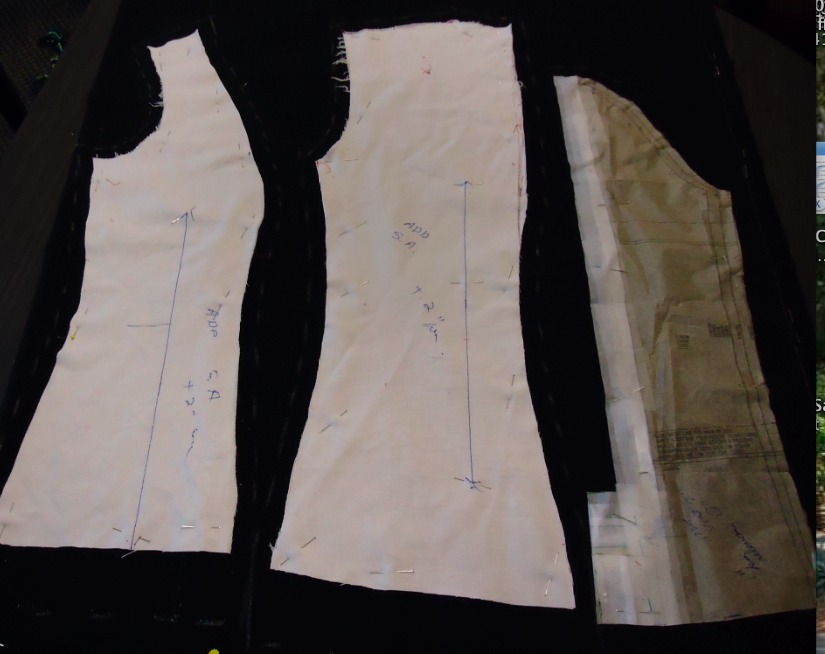
Step one: cut it out using the muslin which I cut apart at the basting lines, eliminating any seam allowances which I had to chalk in. Added 5/8" (yes I know) and 2" hem. Used the sleeve (which I converted to 3 piece- see earlier post) patterns as is as they were OK more or less. Paid attention to grain. If this works out I will make up a brown paper pattern piece with the seam allowances added in for the future (don't hold your breath):


The back looks weird I know. I added a bit to centre back at the bottom for butt coverage but hope it is not as exaggerated as this.

I then pinned the cut fabric pieces wrong sides together to the lining, single layer, and rough cut around each piece because the intended quilting should pull it up some. I will trim the lining down to match once the quilting is done.


Next I flipped the unit over and did sort of relaxed messy basting. Having the pins on the other side was a good idea as it meant my basting thread didn't get caught in the pins. If you do this use a long needle for basting to speed things up. I also used a cotton thread to baste so it would be easier to break if my basting stitches get caught, as they will, in my quilting stitching lines:


I did get only two pieces basted up yesterday. Then I had to go and finish the cherry pie before my husband came home and wanted to eat it.


So far to good.


You have to break this up and having HBO as I do in the hotel room is helpful. I can't imagine basting all these pieces up all day, day after day.


The way I see it this is a bit like teaching a course.


Every course I teach is 24 lectures. 


Now if you thought on day one about 24 full classes of having to think of interesting things to say you would just go home and lie with a cold cloth on your head and maybe read magazines. However, and I know this from experience, if you pretend to yourself that you only have to be intelligent and interesting of 1.5 hours (one class) you can do it. And before you know it you are marking the final papers and telling yourself it wasn't that hard after all.


Basting is just like that.


May do the sleeves today.