Search

Sewing with less stress Front

Sewing with less stress Front
My newest sewing book

Sewing with less stress back cover

Sewing with less stress back cover
What my new book is about

Clothesmaking mavens

Clothesmaking mavens
Listen to me on the clothes making mavens podcasts

About me

My photo
I am a mother, a grandmother, and a teacher. But whatever happens in my life, I keep sewing. I have worked as a political communicator and now as a teacher in my formal life. I have also written extensively on sewing. I have been a frequent contributor and contributing editor of Threads magazine and the Australian magazine Dressmaking with Stitches. My book Sew.. the garment-making book of knowledge was published in May 2018 and is available for pre-order from Amazon
SIGN UP BELOW FOR BARBARA EMODI'S MONTHLY NEWSLETTER

FOLLOW

SIGN UP TO FOLLOW BARBARA EMODI'S BLOG "SEWING ON TH EDGE"

Follow me on Instagram

Instagram
Follow on Bloglovin

Saturday, July 1, 2017

Insta T shirt with experimental neckline

I am in need of some of the most basic of  T-shirts for my summer. I will be taking care of the kids 2 and sometimes 3 days a week in addition to my teaching. I am planning on doing a fair bit of running around and a lot of it outside.

It's good for me to be so busy. I am in the process of getting my head around one son relocated to San Francisco and one to Austin Texas, and although I am very pleased for them - both moves represent great promotions- as a mother situated here in Nova Scotia I am still taking in that this is what the family now looks like. I am finding hanging out with younger children and a toddler very therapeutic while I reconfigure my life a bit. 

Of course sewing is my most grounding activity.

Which brings me back to T-shirts. Since I am in the mood for quick and positive results I have pulled out Jalie's Dolman top which of course also has a sleeveless sort of cap sleeved version.

I whipped this one up pretty fast in some cotton single knit I had lying around.

As you all know single knit really curls to the right side so feeling reckless I played around with the neckline a bit.

I cut the neckband and rather than folding it in half instead I  stitched it single layer to the inside of the neck, right side of fabric to wrong side, flipped it to the right side, and zig zagged it down letting the raw edge just hang out about 1/4" past this top-stitching.

Of course this raw edge rolls into the neckline and to my optimistic eye looks sort of like piping if your standards are fairly fluid:


I am pretty pleased with this since I usually don't sew this randomly, as in raw edges.

Here's the full shot of the T-shirt. A very nice simple summer pattern:


Wednesday, June 21, 2017

Flypaper thoughts emergency sewing division


  • Miss Daisy had a small benign thing removed yesterday from her belly
  • Despite my best efforts and a $35 cone she has ripped her stitches out
  • My vet is in Iceland with my middle son at a friend's bachelor party
  • Don't ask
  • The wedding is in September in Monte Negro
  • You know that one of their friends took his girlfriend to Europe to propose
  • He changed his mind and mailed the engagement ring back for his mom to deal with
  • Mailed it in a sock
  • Back to Daisy
  • Went to the covering vet today who is about 95
  • He told me that dogs in the wild have wounds and no stitches and not to worry
  • My niece who has done a term of nursing and is a genius says it is too open
  • We tried to close it ourselves with steri strips
  • Booked in to see someone else tomorrow
  • In the meantime I am in bed with a dog with an open wound who is trying to get at it
  • Stupid collar cone thing might as well be in Iceland for all the good it is doing me
  • So jumped out of bed and cut up some of the husband's underwear
  • He is out of town
  • Needs new ones anyway
  • Serged it down to Daisy width and sewed the inseam by hand while it was on her to get a good fit
  • Fruit of the loom dog shorts
  • Kneeling on my bed with a needle and thread
  • Student of mine from Newfoundland said she had a friend who sewed so well 
  • She could sew the ass on a cat
  • Well not the only one
  • Publisher said I should do sewing videos
  • You tube here we come
  • Have made a dress and a cardigan this week I love
  • When we get Daisy's seam done I will post pictures
  • Thank goodness rhubarb is in season now
  • You can't beat a nice rhubarb crisp in times of crisis
  • Off I go to the fridge

Tuesday, June 20, 2017

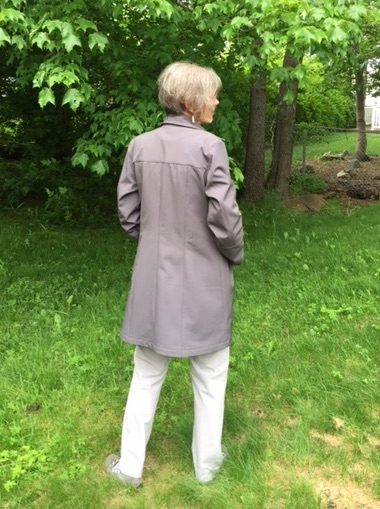
Jalie Stretch City Coat pattern review


On my recent trip to San Francisco I knew exactly the jacket/coat I needed, both there in the misty mornings and at home in the windy and wet days here in Halifax.

Unfortunately I didn’t have exactly that coat with me on my trip. However the first thing I did when I got home was start sewing one.


Jalie’s Stretch City Coat pattern has been around for a while. Many folks have made it, and many of them have made it in a woven, just using a larger sized pattern. I really wanted to stick to the original intent and so having been keeping my eyes open the right stretch fabric for a couple of years now.
I finally found it along the back wall of my local Fabricville.

I decided to use a grey outerwear fabric with a micro fleece bonded to the inside. It is a pretty interesting fabric. The outer side is a tightly woven poplin, much like commander if you have sewn that, and the inside has a very fine micro finer fleece bonded to it. Perfect if you want weather resistant with a little warmth but without the hassle of putting in a lining.
I found this fabric very easy to sew. I used a standard sharp needle and polyester thread but I did lengthen my stitch length to 3.0 for construction and 4.0 for top stitching. There is a fair amount of volume to this fabric, sort of bouncy like Ponte and I felt that the longer stitch length was just more compatible with it.

I made a few changes to the pattern.

First I couldn’t decide on whether or not to do the collar or hood view – one is dressier one more useful – so in the end I made the collar view but sewed the hood up as a separate unit and added three snaps to the back of the collar stand so I could snap on the hood as needed. I placed one snap just a half an inch or so from the end of the collar stand on each side and one at centre back on the back of the stand on the jacket. I then just sewed three snaps on the inside of the hood to match.

This is a bit of a pattern hack and I do realize that one result of that is that the collar has to stand up when the hood is attached. You might think this looks weird but living in Nova Scotia I have no problem with as many rain barriers as I can get. I have also convinced myself that this detail looks edgy and works with the techno nature of the fabric. If you disagree, don’t tell me.

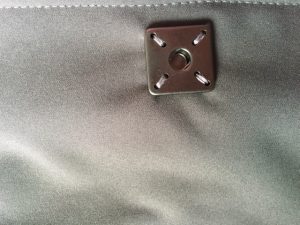
The other variation I made was to change up the suggested buttons and buttonholes for big sew-on snaps. I test sewed a few buttonholes and they just looked small and wimpy to me in this fabric so I went back down to Fabricville and got these wonderful snaps – large ones for the coat and smaller ones for the hood/collar attachment.


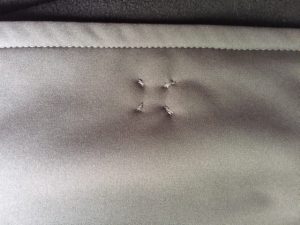
A word on the snaps. I have observed in RTW that the stitches for big fashion snaps like these go right through to the right side of the fabric. Once you get your head around this, and the fact that your hand stitches might not be 100% perfect and that is OK, this are easy to stitch on. Each snap has two holes at each corner which I used in the coat but for the smaller collar snaps just sewed them on through one hole as we are used to doing with snaps.

Use a biggish needle and I really recommend a buttonhole twist or heavier thread for the snap sewing on. The metal of the snaps tends to break an ordinary construction weight thread. I should note though that sewing on all these snaps carefully took a bit of time. I probably spent two sewing days to make the coat and about three sewing nights to do the snaps.

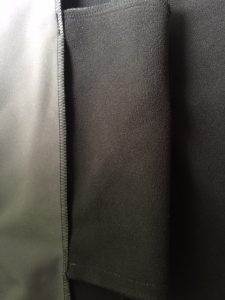
Finally pockets in this coat are interesting – sort of free floating square bags that the pattern instructions tell you to tack to the facings, giving you a reference to an illustration that seems to be on longer available on Jalie’s site.

As a result I sort of improvised here and folded the pocket bags slightly vertically and did a short row of machine stitches to secure the pocket top and bottoms to the facings. This actually seems to work quite well, holding the pockets in place so they don’t flop around but not pulling on the facing.


I really am very pleased with this coat – it has a combination of style and function that really appeals to me. I know I am going to wear it a lot – both at home and when I am on tour visiting.


Tuesday, June 13, 2017

The Swiss Army Knife of Jackets?

For reasons that are a mystery to even myself I have decided I need a completely new wardrobe and style.

Did a big purge yesterday and thought to myself that it was time for a change.

Not sure what that looks like but since my children keep moving around, it will involve some travel clothes.

Having being back from San Fransisco about two weeks I am naturally now starting my sewing for that trip.

Currently I am making the exact all weather jacket I will I had when I was there. Next will be the dress I wished I had and the five tops I really needed.

Back to the jacket.

When you travel even if that means just out your front door (something I should be doing right now because I have three dogs to take care of - see traveling children above) comfort and practicality are important.

When brings me to this little beauty:


If you are in the mood for a smile today, I really suggest this video:


Now if I can get all these dogs walked I might actually get some sewing done today.

Saturday, June 10, 2017

Designer details and new lessons

One afternoon when I was in San Francisco it started to rain. I ducked into Neiman Marcus and headed up to the floor with designer clothes to have a look.

Being very Nova Scotian I went up to the sales folks and said listen I am not buying, but I am a sewer.  I would like to look at the clothes and take a few pictures if you don't mind.

They didn't mind at all and in fact took me to clothes with particularly interesting design details that we talked about. 

What a nice afternoon. 

Sometimes you know when folks think you are from the middle of nowhere they cut you a lot of slack to be honest. In the middle of nowhere you figure out that pleasant goes a long way and most people are really nice.

I had a huge take away from this day that I want to share.

Sometimes when we think of designer details or sewing designer style as in Chanel jacket projects or LBD we tend to work from classic interpretations of technique and forget to look at what designers are doing now.

In my little foray I learned this.

Designers are keeping up and changing. Like every other area they are embracing technology. Sergers are being used actively for new techniques. 

For the home sewer learning from designers can mean as much about learning how to do new things as learning how to do it the old way.

So here are some of the details I found most interesting. All with ideas we can all use. Note too that there still is much handwork but it is strategic not pervasive. I found this interesting.

First a hanging pocket. 

This was in unlined Armani double knit wool jacket with serger together seams bound with Wooly Nylon. Because the outside of the jacket was simple and clean the pocket bag was suspended by four long sturdy serged thread chains from the seam allowance, inside the jacket. From the outside there was no indication of a pocket- on the inside there was a place to put your phone:

Sorry about the fuzzy picture I only had two hands to work with, hopefully you can get the idea

I was also quite take with another unlined Armani coat - in wool where the seams were made by lapping one layer over the other and the raw edges of each layer turned under and hand stitched to make seams without stitching lines. At the edges the layers were turned to the right side on the buttonhole side to make a binding look and under on the button side:


The same jacket also had a knit collar I thought was both beautiful and would be very comfortable:


I saw a lot of serged seams. In this knit dress the serger seams are made with close set stitches with wooly nylon in the loopers so it looks almost like binding:


I was also interested to see some novel bindings. This dress by Dior has the neck and armhole edges covered with grosgrain ribbon, laid on and stitched versus folded. I thought this looked nice and crisp with the seersucker stripe:


The use of ribbing as opposed to classic binding was interesting in this jacket by Chanel - I thought it looked nice and modern and will be borrowing this idea myself. I thought it was beautiful, and without the old lady, Rose Kennedy look, I feel in some of these jackets;


Finally my favourite. 

A simple navy silk duping shirt dress lengthened to floor length. What I particularly liked about this dress was that the concealed button placket actually gets wider as it goes down the dress, keeping the proportions of the flared skirt perfect. 

We could make a dress like this, couldn't we?


Wednesday, June 7, 2017

Pattern review: two new Jalies

I am in the process of experimenting with new shapes and styles.

I mean why not?

What I wear day-to-day matters to me. I want to be comfortable and I want to be interested in what I have on. I enjoy wearing new clothes and new to me styles. Some times this works out and sometimes it doesn't in as in a  "You have to be kidding" evaluation from my eagle-eyed daughter.

Right now I am trying out new pants shapes. 

It's a bit of a campaign.  I am getting sort of sick of the slim pants and then the long top to hide the gut routine. Maybe I want to dress without feeling there is a part of me I want to hide. Having to think like that gets sort of tiring.

Any of you identify with this?

So when the latest raft of Jalie patterns came out I realized they presented me with some opportunities to try out something I never thought I would wear. 

Never want to get to be a rusty dresser. 

Also the Fabricville at the bottom of the street now carries Jalies and they also have some nice tencel pant weight and some very silky bamboo.

This was all I needed.

So fooling around I decided to make the Vanessa fluid pants and the Marie-Claude knit top.

Here are the pattern pictures:


The Marie-Claude is a raglan T-shirt with a shaped hem and a fairly high crew neckline, with an option as well for a turtleneck or a close hood. 

Given it is now spring, even in Nova Scotia, I decided to make the crew neckline. The result is what I would call a base layer type top, fine on its own, particularly as it has a body skimming as opposed to very fitted silhouette, but ideal as a top to wear under a jacket too. 

It seems these days that many necklines are either scoop or boat neck and I really enjoy wearing a comfortable round neck for a change. I can see this pattern could easily be made in a lycra for a sunshirt to wear around the pool with the kids and I think I might trace a smaller size and do just that.


I made a few changes to this top in my version. First I lengthened it by 2”, something that was super easy to do as the top pattern pieces are one lower section and two different top sections (one for the front and one for the back) that you lay above the bottom pattern pieces to cut each out. It was easy to just spread the pattern pieces apart at 2” at this point. I am tall and this extra 2” is an almost automatic adjustment for me.


I twin-needled the hem of the top but the sleeves have a band at the bottom - there is a slight little boy p.j top vibe going on here that I like. Little boys are generally very comfortable.

The Vanessa tracker pants are excellent. For some reason all us home sewers for years struggled with pants fitting and now we finally have access to great pants drafts with real ready-to-wear fit. This seems to me to have eliminated so many of our fitting issues. And about time too.

Not the most flattering picture but this view really gives you an idea of the shape of the leg


These pants really require a fabric with drape, indicated quite clearly in the flowing pants description, so the tencel is perfect. 

They can be made with either the elastic at the bottom, which I did, or hemmed, which I might do in the next pair. The pattern has interesting nice deep pockets and a flat section at centre front the break up the gathers of the otherwise full elastic waist casing. This flat piece is supposed to be a place for eyelets and a drawstring but I left that detail out in mine – I don’t like or need any extra bulk around my waist.

I also made one change to the pants after I had worn them for a day and surprisingly this was to shorten them 1 ½”.

I decided after having observed other folks wearing tracker pants (OK so these were bearded mean barrelling past me on bikes on the streets of San Francisco) and it seemed to me that theirs were sleeker at the bottom than the sort of bloused look I got when I tried out the length specified in the pattern. As a result I shortened these pants before I signed off on them.

It's pretty cool to have two new patterns turn out so well. 
Nothing like instant TNTs!


Monday, June 5, 2017

So what's your uniform?

This is a question that has long interested me.

Do we all, in some way, have a clothing uniform - an outfit we default to and wear most often?

If we do, do we give it enough thought? 

Is it our most comfortable, easiest to reach, no thinking outfit, or is it something we plan and develop?

This article suggests those of us who do dress my uniform think about what image we are projecting with it.

I am interested in your thoughts.

Do you have a uniform?

If so why?

If not why not?

Is your uniform planned or unplanned?

An interesting question as we all get dressed for the day.